...
...
...
...
...
...
...
...
...
...
...
...
...
...
...
...
...
...
...
...
...
...
...
...
...
...
...
...
...
...
...
...
...
...
...
...
...
...
...
...
...
...
...
...
...
...
| Warning |
|---|
Our Cloud Help Center has a new home at https://help.tempo.io/cloud/
We will no longer be updating Cloud documentation in this space, so please be sure to check the new site for the latest documentation and learning content. |
You can track time against issues by using the trackers on your dashboard. When you add the Tempo Tracker gadget to your dashboard, it automatically includes all of your existing trackers and provides an option to create new trackers.
For information about how to add the gadget to your Jira dashboard, see Tempo Gadgets - Tempo Cloud.
To use the gadget:
- Go to the Tempo Tracker gadget on your Jira dashboard.
- You can click the
at the upper-right to maximize the tracker.
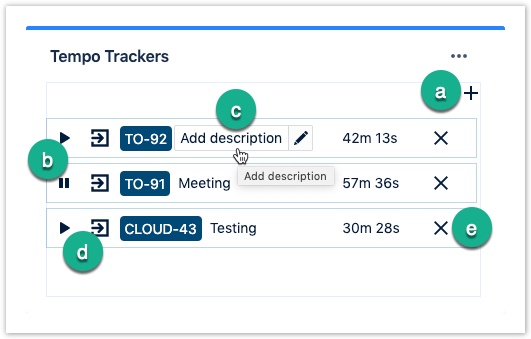
- Click the plus to add a new tracker to the dashboard.
- Use the controls to start and stop your tracker. Click Play
 to start timing and Pause
  to stop. The tracker will run in the background, even if the dashboard is closed.
 - You can add a description for the tracker.
- When you have finished work on the issue, you can save tracked time as a time record. Clicking
 in the tracker opens the Log Time form with Time spent, Start time, and End time automatically recorded from the tracker. When the time record is submitted, the tracker closes.
 - Click X to delete a tracker.
Related Topics
...