Revenue Operations
Select an existing non-consulting revenue to modify by clicking on it and then either click on the ... menu on the top-right part of the details panel (on righthand side of the screen) and select the Edit option or hit the e (for edit) shortcut key. This brings up the edition dialog.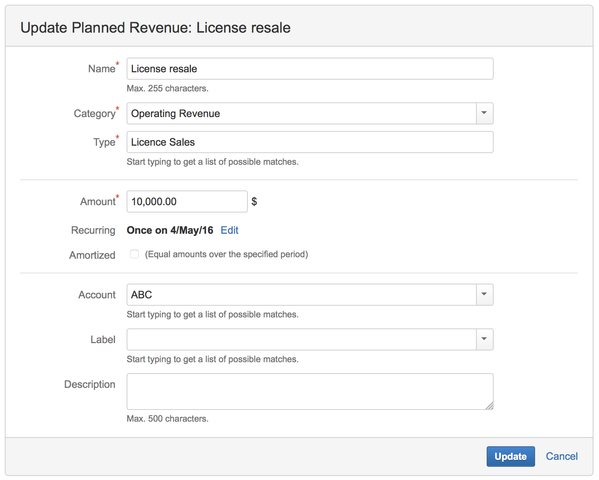
Name | Name of the revenue. Examples: ABC Software License Sales, 101 Main Street, etc. |
|---|---|
Amount | Amount of this revenue. Note that in the case of a recurrent revenue, the amount of the payments received for that revenue will depend if it is amortized or not. In the case of an amortized revenue, the amount will be evenly split over the number of payments defined in the recurrence definition. Otherwise, the amount of each payment is the amount entered here. |
Category | Category of the revenue. See section Categories for more details on each option. |
Type | Type of the revenue. It is used to classify revenues and for filtering in reports. While typing in this field, types entered previously for other revenues that match what you type will be suggested to you for completion to help you avoid typos and duplications. Examples: Rent, Office furniture, Licenses, etc. |
Recurring | By default, a non-consulting revenue occurs on a single date. To change the date of occurrence of that revenue or to make it recurrent (and possibly amortized), click the Edit link. This brings up a dialog to define the recurrence for that revenue. As you change the values in that dialog, you are presented with a phrase explaining the recurrence, in the text area located just above. Refer to Recurrence for more details. |
| Amortized | Specifies if the received payments for that revenue be should split over a period of time or not. This option appears under the Recurring field when the Repeat value in the Recurrence definition dialog is changed to something else than Once. When amortized, the this revenue gets evenly split into payments occurring on dates defined in the Recurring field. |
| Account | Specifies the Tempo Account to associate the expense with. (optional) |
| Labels | JIRA Issue Labels to associate the revenue with. Refer to Labels for more details. |
| Description | An optional, free form description of the revenue. |
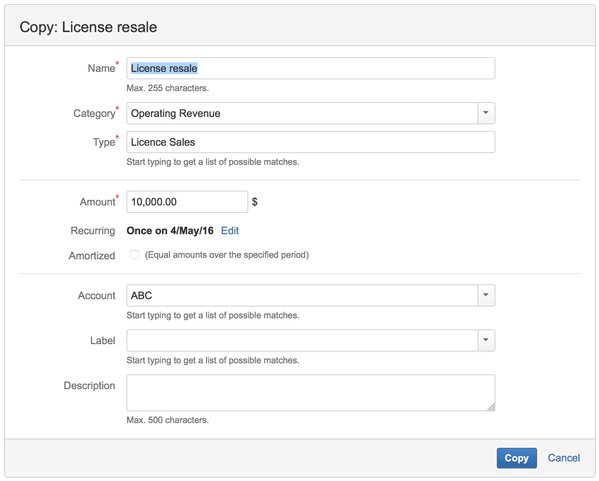
Copying a Revenue
Select an existing revenue to copy by clicking on it and then either click on the (![]() ) icon or hit the 'y' shortcut key. This brings up a dialog with the source item meta data that you can accept as is or quickly change if need be.
) icon or hit the 'y' shortcut key. This brings up a dialog with the source item meta data that you can accept as is or quickly change if need be.
Deleting a revenue
Select an existing revenue to delete by clicking on it and then either click on the ... menu on the top-right part of the details panel (on righthand side of the screen) and select the Delete option or hit the d (for delete) shortcut key. This brings up a dialog to confirm the deletion. Click the Delete button to confirm the deletion, or Cancel link to abort. Deletion is permanent, thus make sure you really want to delete the revenue before proceeding.
You can delete multiple revenues at once. Refer to the Multiple Selection to learn how to perform a batch deletion.
Attaching files to a revenue
You can attach files to a revenue in order to keep related documents handy (invoices, quotations, etc.). To attach files to a revenue, select it and then click button Attach Files in revenue details panel on the right. This brings up a dialog where you can pick a file (or multiple files simultaneously, if your browser allows it) and enter an optional comment.
Viewing Revenue details
When selecting a revenue, more information on that revenue is displayed in the details panel on the right. Note that you can also select multiple revenues at once by selecting multiple lines. This provides you an aggregated view showing the total income associated with these revenues.
Searching for revenues
You can search for revenues by their name using the search box located at the top left of the screen.
Tempo for Server Documentation
For the newest versions of Tempo documentation, please visit our Help Center. For support, see our Support Portal.