Manage Portfolios
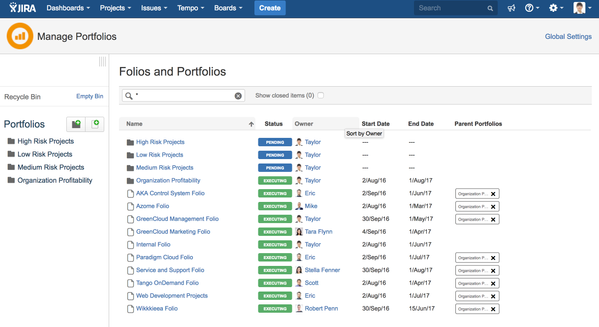
The Manage Portfolios screen is the main entry point for creating, configuring and deleting Folios and Portfolios. It is also where you access /wiki/spaces/HCBUDGETS/pages/3393620150. The screen is accessed from the Tempo menu located in JIRA's menu bar (Tempo > Portfolios > Manage Portfolios). It has two sections:
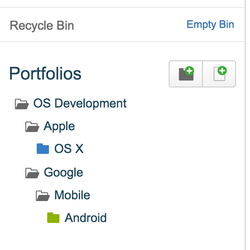
A sidebar located at the left of the screen, showing a tree view of existing Portfolios
- The main page view showing the content of the selected portfolio(s) in the tree view.
Each one gives you access to a number of operations, including associating Folios with Portfolios by drag and dropping elements from the main part of the screen to a portfolio in the tree view.
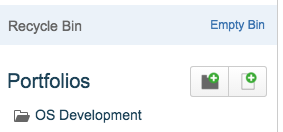
Portfolios
The sidebar at the left displays portfolios in an a hierarchical, file explorer-like view. The portfolios a user can see is determined by the /wiki/spaces/HCBUDGETS/pages/3393620150.
Adding a Portfolio
To add a new Portfolio, click the Add portfolio (![]() ) icon.
) icon.
Portfolio creation options
Once you are presented with the portfolio creation dialog, you can proceed with portfolio creation in various ways.
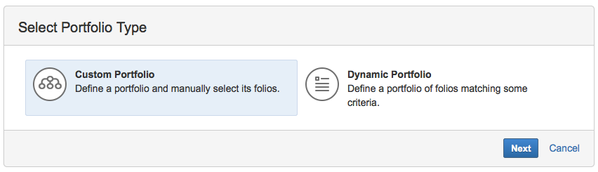
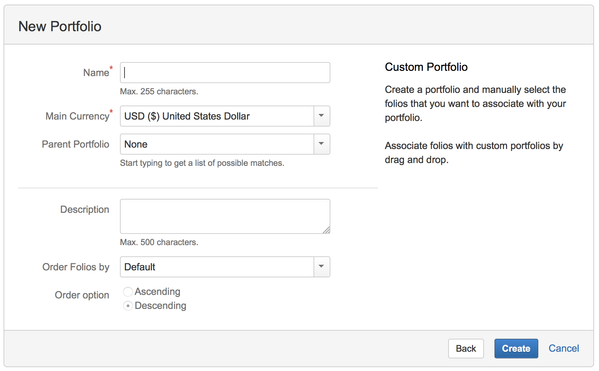
Custom Portfolio
Use this option when you want to create a Portfolio to which you can decide which Folios are associated or not.
| Required parameters | |
|---|---|
| Name | Name of the Portfolio Maximum of 255 characters |
| Main Currency | Currency in which amounts are shown when viewing the Portfolio. Folios it contains may use different currencies, in which case all amounts will be converted to the Portfolio's currency using a currency conversion service. |
| Parent Portfolio | The parent portfolio if any |
| Optional parameters | |
| Order by | Name of the field to use for sorting Folios in this Portfolio (/wiki/spaces/HCBUDGETS/pages/3394176049 and /wiki/spaces/HCBUDGETS/pages/3393686448). This includes Owner, Start Date, End Date and all your defined Folio Custom Fields. |
| Order option | Specifies if the Folio is sorted by ascending or descending value of the field selected in Order by setting. This setting is ignored if Order by is None. |
| Description | A short description of the Portfolio. Maximum of 500 characters |
Adding Folios to a Custom Portfolio
You can add folios and portfolios to a custom portfolio using drag and drop. First /wiki/spaces/HCBUDGETS/pages/3394077665 (folios and/or portfolios) in the main part of the screen and drag them to a visible portfolio in the tree view on the left. A dashed border will appear around custom portfolios where items can be dropped in the tree. While dragging items, the items count is shown in a colored circle in the upper right corner of the dragged box.
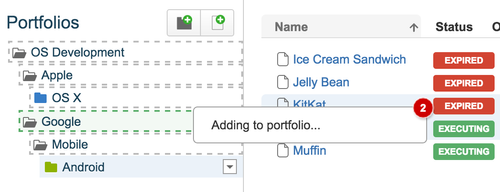
Dragging folios to a portfolio adds them to that portfolio without removing them from their original portfolio. Folios can belong to as many portfolios as you want. Folios can only be associated to the portfolios that you can edit.
Be aware that you should arrange your folios in such a way that a portfolio does not recursively contain the same folio multiple times. Such a situation can arise for instance if you have a portfolio A containing folio 123 and portfolio B, and then adding folio 123 to portfolio B. The consequence is that portfolio A will provide totals that sum up folio 123's numbers twice.
When this situation occurs, a warning sign (![]() ) will appear on the corresponding portfolios lines in the main part of the screen. A global warning will also show up when opening a portfolio.
) will appear on the corresponding portfolios lines in the main part of the screen. A global warning will also show up when opening a portfolio.
By contrast with folios, dragging a portfolio inside another portfolio moves it. Note that you cannot move a portfolio to itself or to any of its child portfolios. Portfolios can be dragged from the tree view as well as from the main part of the screen.
Removing a Folio from a Portfolio
To remove a folio or portfolio from a portfolio, click on the x found in the tag of the corresponding Portfolio in the list under column Parent Portfolios.
You can only remove folios or portfolio from portfolios that you own.
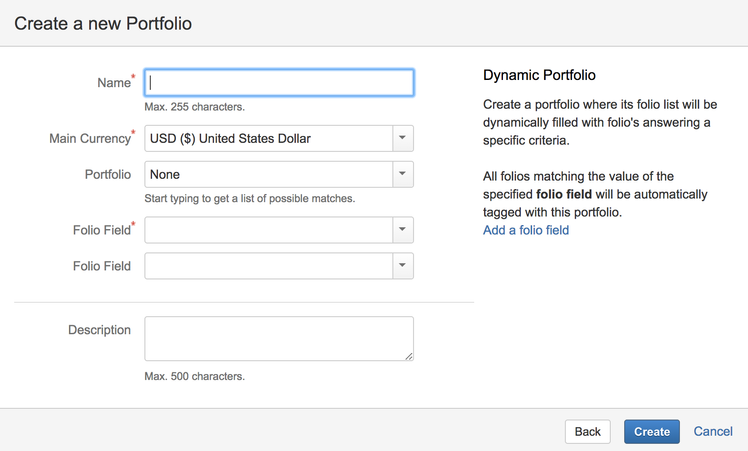
Dynamic Portfolio
Use this option when you want to create a portfolio that includes all Folios that currently match one or more conditions.
| Parameters | |
|---|---|
| Name* | Name of the portfolio Maximum of 255 characters |
| Main Currency* | Currency in which amounts are shown when viewing the Portfolio. Folios it contains may use different currencies, in which case all amounts will be converted to the Portfolio's currency using a currency conversion web service. |
| Portfolio | The parent portfolio, if any. |
| Folio Field* | Folio field to be used as a criteria to create the dynamic portfolio. This field is required. |
| Folio Field | Secondary Folio field. You may select one or two folio fields as criteria to create a dynamic portfolio. Folios that match the requirements of both Folio fields will be included in the dynamic portfolio. |
| Description | A short description of the Portfolio. Maximum of 500 characters. |
Add a custom Folio field to a Dynamic Portfolio
The Folio Field defines which Folios will be automatically included in the Dynamic Portfolio. The possible values for the Folio Field are Owner, Start Date, and End Date. If you prefer, you can also use any Custom Folio fields as a Folio field.
You can add, delete, or configure Custom Folio Fields by navigating to Global Settings > Custom fields, or by clicking on Add a folio field in the dialog box when you create a new Dynamic Portfolio.
Configuring a Portfolio
To configure a portfolio, select it in the tree view on the left and click the drop-down arrow that appears next to the portfolio's name. Click Configure to bring up the /wiki/spaces/HCBUDGETS/pages/3394176350.
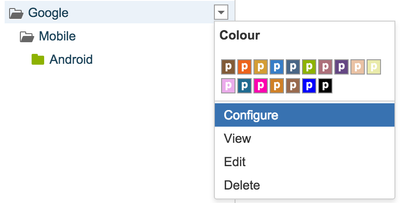
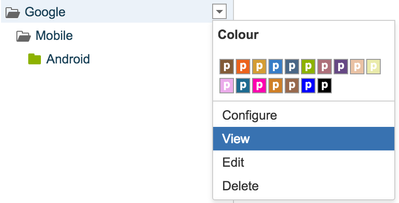
Viewing a Portfolio
To open and view a portfolio, you can click the portfolio's name in the main part of the screen, or select it in the tree view on the left and click the drop-down arrow that appears next to the portfolio's name, and then click View to bring up the /wiki/spaces/HCBUDGETS/pages/3394176049 screen.
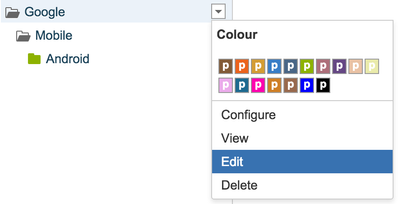
Editing a Portfolio
To edit a portfolio, select it in the tree view on the left and click the drop-down arrow that appears next to the portfolio's name. Click Edit to bring up the Edit Portfolio dialog (refer to the creation dialog of the corresponding Portfolio type).
Deleting a Portfolio
To delete a portfolio, select it in the tree view on the left and click the drop-down arrow that appears next to the portfolio's name. Click Delete and confirm to delete the portfolio.
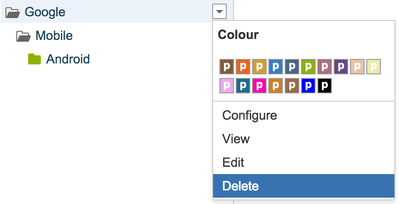
Deleting a portfolio does not delete the folios or portfolios it contains.
Portfolio Content
The main part of the screen shows the content of the portfolio(s) that is (are) selected in the tree view on the left. It lists the folios and portfolios that you are authorized to see and their summary information. folios you can see include:
- All folios that you own
- All folios that you are allowed to browse (see Folio's Permissions).
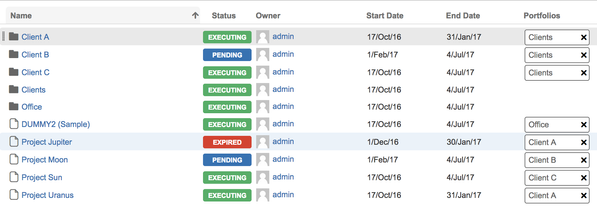
The folios and portfolios are sorted by their name by default, with portfolios showing first.
Customizing Folio information
To customize the information displayed about Folios, folio custom fields can be added as default columns for all users by starring them in the Tempo Budgets's global configuration, Users can also customize their own column display via the "Columns" drop down.
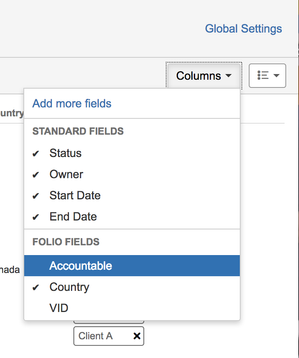
Adding a field as a column allows you to sort and filter the portfolio/folio list
Searching for Folios and Portfolios
You can search for folios and portfolios by typing in characters in the search box located at the top of the main portion of the screen. The list of folios and portfolios having a name matching the search box content is updated as you type.
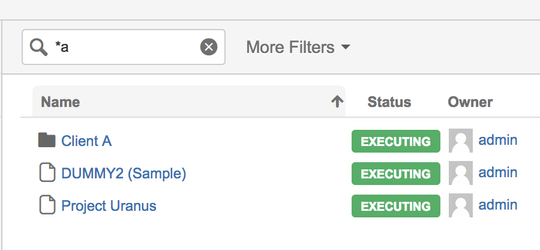
Using the wild card * will retrieve all folios and portfolios that a logged in user can see.
You can also search by criteria such as, by status, by owner and by any folio custom fields value.
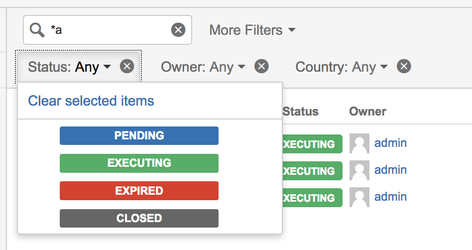
- The search items are based on the values used by the folios, A value not used will just be ignored.
- The query can be read as:
ALL folios and portfolios WHERE
( Filter 1 EQUALS item A OR item B ) AND
( Filter 2 EQUALS item X OR item Y ) AND ...
Sorting Folios and Portfolios
You sort folios and portfolios in various ways from the Manage Portfolios screen. First, a default sort order can be defined on Folio Custom Field through the Global configuration. Second, you can click on the header of a column in the list view. Clicking again on the same column header reverses the sort order. The sort order thus selected is memorized in your browser for later accesses to that page.

Creating a Folio
To create a new folio, click on the Add Folio button (![]() ) in the upper right corner of the screen, or type n shortcut key.
) in the upper right corner of the screen, or type n shortcut key.
Please refer to Create Folio for more details on folio creation.
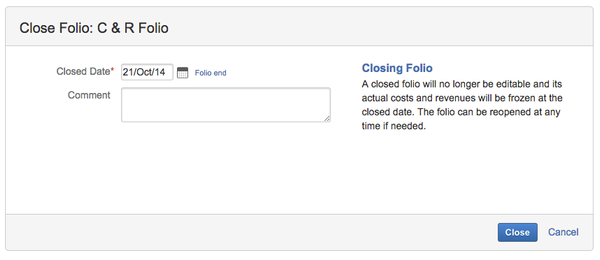
Closing a Folio
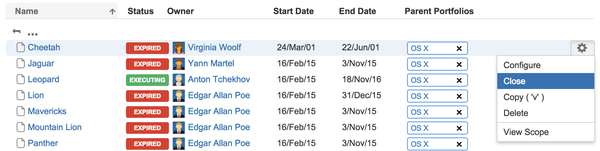
Closing a folio clearly indicates that the project is done. When closed, a Folio is not editable and its actual costs and revenues are frozen at the close date. You can reopen a Closed Folios if needed. To close a Folio, first select it by clicking on the Folio's row in the list and then click the cog icon and select Close. This brings up the Close Folio dialog.
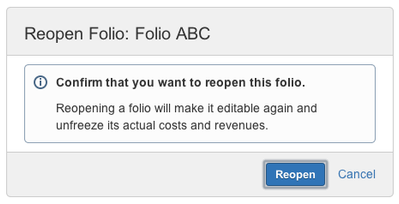
Reopening a Folio
You can reopen a closed folio. To reopen a folio, click to select from the list and then click the cog that appears and select Reopen. Confirm to Reopen the folio.

Copying a Folio
To copy a folio and its data, first select it by clicking on the folio's row in the list and then click the cog that appears and select Copy. You can alternatively type v when the row is selected. This brings up the Copy Folio dialog.

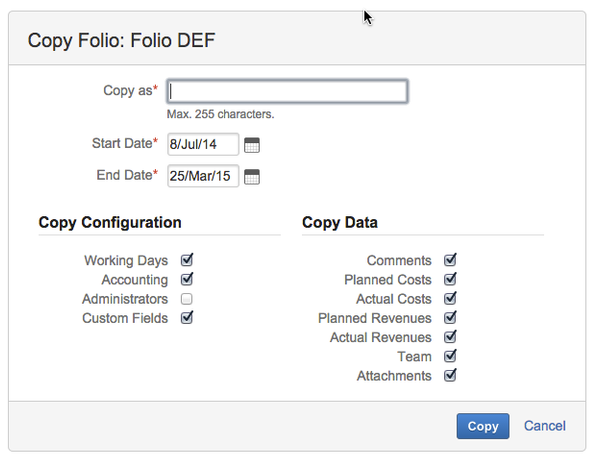
| Required Parameters | |
|---|---|
| Copy As | Name of the new Folio Maximum of 255 characters |
| Start Date | Start date of the new Folio. By default, the start date of the copied Folio. Must be before the end date |
| End Date | End date of the new Folio. By default, the end date of the copied Folio Should be after the start date |
| Optional Parameters | |
| Working days | Select to include the working days configuration of the selected Folio in the copy. |
| Accounting | Select to include the accounting configuration of the selected Folio in the copy. |
| Administrators | Select to include the administrators of the selected Folio in the copy. |
| Custom Fields | Select to include the custom fields (and their values) of the selected Folio in the copy. |
| Comments | Select to include the comments of the selected Folio in the copy. |
| Planned Costs | Select to include the planned costs of the selected Folio in the copy. |
| Actual Costs | Select to include the actual costs of the selected Folio in the copy. This includes Expenses. Actual positions are copied by copying the staff members. |
| Planned Revenues | Select to include the planned revenues of the selected Folio in the copy. |
| Actual Revenues | Select to include the actual revenues of the selected Folio in the copy. |
| Staff | Select to include the staff members of the selected Folio in the copy. This includes all staff members and unfulfilled positions. |
| Baselines | Select to include the baselines of the selected Folio in the copy. |
| Attachments | Select to include the attachments of the selected Folio in the copy. |
When copying, the new folio created inherits the Scope of the copied folio. The new Folio's saved filter is also set as private but can easily be shared with other users by editing its filter shares (see Folio's Permissions).
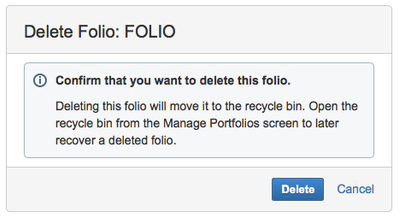
Deleting and Recovering a Folio
To delete a folio, select it by clicking on the folio's row in the list and then click the cog that appears and select Delete. You can also type d when the row is selected. Confirm to delete the folio. Deleting a folio moves it into the recycle bin. It can be recovered at any time.

To recover a folio first select the recycle bin, select the folio by clicking on the folio's row in the list and then click the cog that appears and select Recover. You can alternatively type r when the row is selected.

Emptying the recycle bin is irreversible. Any folios in the bin, including any attachments will be permanently deleted. i
Note that the JIRA Issues, Projects or Saved filters are not deleted when folios are deleted.
Accessing Global Settings
To access Tempo Budgets's Global Configuration, click the Global Settings link at the top right of the page.
You must be a Folio Super Administrator to modify the Global Configuration.

Tempo for Server Documentation
For the newest versions of Tempo documentation, please visit our Help Center. For support, see our Support Portal.