Many customer plan their work within Jira Sprints and are looking for an "automated" way to sync the planned Jira issues within a Jira Sprint to Tempo Planner. Tempo Planner does not offer a "out-of-the-box" solution. But the job can be done with the help of a customized script that is using available Jira and Tempo APIs to create Tempo plans from a Jira sprint. This tutorial provides some guidelines for the use of the necessary APIs needed to create a minimal solution. More sophisticated solutions that are e.g. covering a scope change, the change of the start and end date of the Jira sprint or the change of an assignee of an Jira issue are not covered specifically as the guidelines focus on a "one-time creation" of plans in Tempo Planner.
- To create a plan within Tempo Planner you will need the information of:
-for whom is the plan created for. We assume that the assignee of the Jira issue is the user that we are going to plan for.
-start date and end date. The dates are specified in the Jira sprint
-the planned hours per day. There might be various approaches. In our example we assume that the planned hours per day is calculated from the remaining estimate on the Jira issue and the available working days during the Jira sprint. This is probably the most crucial part as the planned time could of course exceed the workload limit and is not considering already existing plans.
-what is being planned for. This is the Jira issue itself
-description of the plan. Optional
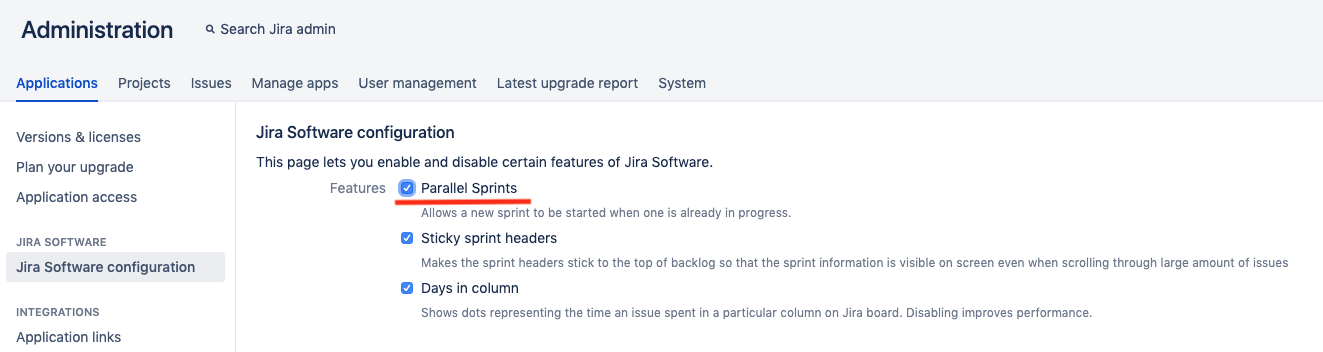
-plan approval. Optional - We assume that you plan for multiple sprints at once. As Jira allows by default only to have one Jira Sprint running you should enable the option to can work with multiple sprints. This can be configured within the Jira Software configuration
- Our script that is doing the job for us should be fired from a Jira Webhook that is triggering that the script will be run once a Jira Sprints got started.

Important is that we pass the information of the affected Jira Sprint to the script and to ensure that the Webhook is configured that it is fired once a Jira Sprint is started. - Our script needs to perform several API calls once it gets fired by the Webhook. First we need to collect all the basic information (listed in step 1) before we can finally create a plan within Tempo Planner.
-the start and end date of the Jira Sprint (and the name that we could use for the optional planner description).
API to call: http://localhost:8080/rest/agile/1.0/sprint/51 with the method: GET. Where "51" gets replaced by the Jira Sprint ID that will be passed to our script.
The response contains the naem ("name"), the start date ("startDate") and the end date ("endDate")
-the Jira issues within the Sprint.
API to call: http://localhost:8080/rest/agile/1.0/sprint/51/issue?fields=timetracking,assignee with the method: GET. Where "51" gets again replaced by the Jira Sprint ID.
The response is paginated and you might need to call the API multiple times by using the "startAt" parameter or exceed the default value of the returned issues (50) by adding the "maxResults" parameter. Now you need to lop throught the results and get the for all returned issues the ID ("id"), the remaining estimate ("timetracking"→"remainingEstimateSeconds") and the assignee ("fields"->"assignee"→"key")
-the information about the available amount of working days during the Jira sprint
API to call: http://localhost:8080/rest/tempo-timesheets/4/private/days/search with the method: POST. For the POST method we need to send a payload in the format: {"from":"2019-05-18","to":"2019-05-25","userKeys":["amy"]} where we replace the "from" and "to" with the Jira Sprint start and end date and for the "userKeys" we set the assignee of the Jira issue.
The response will include all days during the period and Tempo will tell us if that day is working day ("type": "WORKING_DAY") for the user or not ("type": "NON_WORKING_DAY"). Our script should count the working days. The response will also tell us about the workload for each day ("requiredSeconds") in the case of you want to use that number for any other logic within your script.
From the number of working days and the remaining estimate of the Jira issue we can calculate the planned time per day (remaining estimate/number of working days)
-Finally create the plan within Tempo
API to call: http://localhost:8080/rest/tempo-planning/1/plan with the method: POST. For the POST method we need to send a payload in the format: {"description":"Plan for Jira Sprint xy","planItemType":"ISSUE","planItemId":"10017","planApproval":{"reviewerKey":"john","statusCode":1},"start":"2019-05-16","end":"2019-05-18","assigneeKey":"david","secondsPerDay":3600} where "description" is the name of the Jira Sprint (optional), the "planItemId" the Jira ID, "start" and "end" are start and end date of the Jira Sprint, the "assigneeKey" the Assignee of the Jira issue and "secondsPerDay" the calculated number from the step above. You can add a reviewer to the plan ("planApproval":{"reviewerKey":"john","statusCode":1}) but that section can be skipped.