Import from Service
This page explains how to import accounts from service by wrapping the data into an XML file. The page is divided into two sections, first how to import and then the content and structure of the XML file is explained.
The XML Import from Service was included in Tempo Account Manager included in Timesheets versions lower than Timesheets 7.10. it is available in Tempo Accounts to respect backwards compatibility
![]() The Account Custom Field is installed automatically with Tempo Accounts, but needs to be set to the screens according to your needs.
The Account Custom Field is installed automatically with Tempo Accounts, but needs to be set to the screens according to your needs.
How to Import
This is an ideal way to establish a semi-automatic way to import accounts as explained below:
- Prepare an XML file (see guidelines below) and place it on a web server.
- Choose the Import and Export Accounts option from the Manage menu, to access the Import / Export Accounts screen.
- Click the Import from service button, which opens the Import Accounts from XML Service dialog.
- Copy the url for the XML file and paste it into the text field.
 It is the JIRA server that will execute the request and therefore your JIRA server must have access to your service url.
The Import Accounts from XML Service dialog (click to enlarge)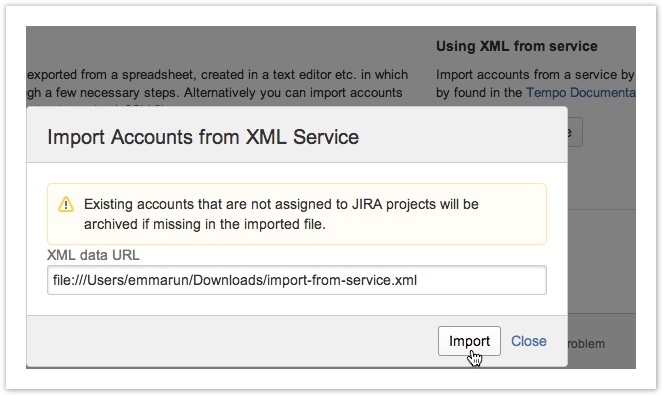
- Click the Import button to finish the process or the Close link to opt out.
![]() A few notes:
A few notes:
- JIRA Issues created before linking their project to an account, do not automatically become set to the account value. The value needs to be set afterwards and it is possible to bulk edit the JIRA issues.
- If the relationship between an account and a project is one-to-one, then the account is selected by default when a new issue is created in the project.
- Newly created accounts, get status Open after import.
- The Manage Accounts page explains when accounts get status Archived and other possible cases/results from the import.
- It is currently not possible to import with a scheduler, that runs the job each hour, as a way to automate this process.
XML File Explained
The code block below shows the structure of the XML file, with an example of two accounts.
![]() The creation of this file could be automated in an external account system, but you will always have to manually click the button as explained above.
The creation of this file could be automated in an external account system, but you will always have to manually click the button as explained above.
The mapping of XML tags to attribute names is explained in the table on the Import Template CSV page. It is not always necessary to use the complete set of XML tags, like the last three can be omitted easily. The latter account in the code example is associated to two different JIRA projects, by using a comma (",") separator between the project keys.
Code block, showing an example of an XML file containing two accounts
<?xml version="1.0" encoding="UTF-8"?>
<accounts>
   <account>
      <accountId>901401</accountId>
      <accountName>Development New</accountName>
      <customerId>100201</customerId>
      <customerName>CloudBay</customerName>
      <customerContactName>John Brown</customerContactName>
      <categoryId>300</categoryId>
      <categoryDescription>Development</categoryDescription>
      <employeeId>erica</employeeId>
      <employeeName>Erica Jefferson</employeeName>
      <jiraProjectKey>CLOUD</jiraProjectKey>
      <isGlobal>true</isGlobal>
      <monthlyBudget>0</monthlyBudget>
   </account>
   <account>
     <accountId>ERT</accountId>
      <accountName>TO OPEX</accountName>
      <customerId>ERTA</customerId>
      <customerName>GreenCl.</customerName>
      <customerContactName>John Steel</customerContactName>
      <categoryId>ERTB</categoryId>
      <categoryDescription>Service plus Mant</categoryDescription>
      <employeeId>robert</employeeId>
      <employeeName>Robert Penn</employeeName>
      <jiraProjectKey>SUPPORT,TO</jiraProjectKey>
      <isGlobal>false</isGlobal>
      <monthlyBudget>200</monthlyBudget>
   </account>
</accounts>
Tempo Timesheets for Server Documentation
For the newest version of Tempo Planner documentation, please visit our Help Center. For support, see our Support Portal.