Import Template CSV
This page explains how to import accounts from template CSV. The page is divided into two sections, first how to import and then the content and structure of the CSV file is explained.
The Import Template CSV was included in Tempo Account Manager included in Timesheets versions lower than Timesheets 7.10. it is available in Tempo Accounts to respect backwards compatibility
![]() A few notes:
A few notes:
- The Import Custom CSV offers a new way to similarly import a *.csv, but the user is lead through a series of screens to accomplish the goal.
The Account Custom Field is installed automatically with Tempo Accounts, but needs to be set to the screens according to your needs.
How to Import
Follow these steps to import accounts from a CSV template:
- Choose the Import and Export Accounts option from the Manage menu, to access the Import / Export Accounts screen.
- Select the Import template CSV button, which opens the Import Accounts from CSV template dialog.
The Import Accounts from CSV Template dialog (click to enlarge)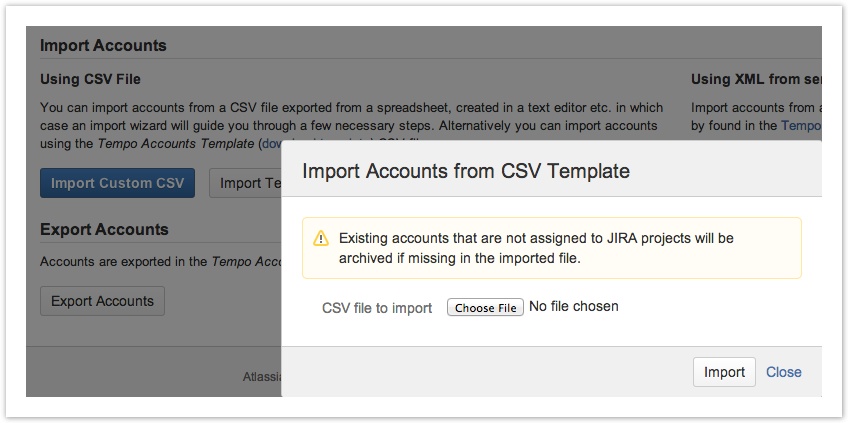
- Click the Choose File button and browse for your *.csv file to import.
 A template file (TempoAccounts.csv) can be downloaded from the Import / Export Accounts screen, with a header line and one example account line.
 - To exit the dialog, click the Import button to finish the process and Close link to opt out.
![]() A few notes:
A few notes:
- JIRA Issues created before linking their project to an account, do not automatically become set to the account value. The value needs to be set afterwards and it is possible to bulk edit the JIRA issues.
- Newly created accounts, get status Open after import.
- The Manage Accounts page, explains when accounts get status Archived and other possible cases/results from the import.
- All extra columns (no. 13 and above) in the import are ignored.
CSV File Explained
Table: The CSV file attributes/columns in order, both required and optional
| Order | Name | XML tag* | Required** | Description |
|---|---|---|---|---|
| 1 | Account Key | accountId | Yes | Unique identifier for the Account Name, but it is also used as primary key for an account dataset.
|
| 2 | Account Name | accountName | Yes | Descriptive name for the account. The combination of the Account Key and Name is used to display the account in a JIRA issue or in the Log Work dialog.
|
| 3 | Customer Key | customerId | Yes | Unique identifier for the Customer Name, which is only displayed on the add account Customers screen.
|
| 4 | Customer Name | customerName | Yes | Descriptive name for the customer. The customer is a way to group together JIRA projects or cost centres by customer or a common entity of your definition for the projects.
|
| 5 | Customer Contact Name | customerContactName | Yes | This is someone who represents the customer, either internally or externally. |
| 6 | Category Key | categoryId | Yes | Unique identifier for the Category Name, which is only displayed on the add account Categories screen.
|
| 7 | Category Name | categoryDescription | Yes | Descriptive name for the Category. This is a way to create a division for an Account/Customer like Development or Marketing.
|
| 8 | Account Lead Username | employeeId | Yes | The Account Lead is responsible for the account. If a value is provided for the Account Lead in the import file, it either needs to be the Username or Name:
|
| 9 | Account Lead Name | employeeName | Yes | See no. 8 above on Account Lead Username. |
| 10 | JIRA Project Key | jiraProjectKey | No | The project key as in JIRA. Use comma (",") separator to import keys for many projects for the same account.
|
| 11 | Global Account | isGlobal | No | If you want the account to be Global, add value TRUE for this attribute in the import file and it will be displayed as Global in the linked Projects column in the Accounts Browser.
If the value is FALSE or no value is provided, the account is not Global. |
| 12 | Monthly Budget | monthlyBudget | No | The final available attribute is to add a Monthly Budget if preferred to the account. |
* Which XML tag in the XML Import from Service file maps to attribute explained here.
** Required attribute/column, which means that the column needs to exist with a semicolon delimiter in the file, even though it has no value. The only required values are the Account Key and Name for successful import.
![]() A few notes:
A few notes:
- The Account Key - Name, Customer, Category and Account Lead Name are all search-able in the Account Timesheet and account Reports.
- If the relationship between an account and a project is one-to-one, then the account is selected by default when a new issue is created in the project.
An example of a row in a CSV file, where two optional attributes are included, e.g. a JIRA Project Key (TST) and a Global Account as false.
12000002;TM Software: Tempo;12345;Tempo Development;John Doe;300;Internal Dev.;JJ;John Johnsson;TST;false
The Account, Customer and Category keys do not need to be numeric.
An example from the Tempo template where the Customer and Category Keys are not numeric (only required attributes are shown in this example).
#Account Key;Account Name;Customer Key;Customer Name;Customer Contact Name;Category Key;Category Name;Account Lead Username;Account Lead Name
2200001;Acme Development;ACME;Acme Corporation;John Steel;DEV;Development;erica;Erica Jefferson
Tempo Timesheets for Server Documentation
For the newest version of Tempo Planner documentation, please visit our Help Center. For support, see our Support Portal.